Professionals are sharing this step-by-step tutorial to let you learn about the process of integrating twitter bootstrap in ASP.NET mvc development solution. You will get to know about the basic requirements first to learn the process. You will also read about the use of bootstrap in ASP.NET development solution. Make a thorough read of this post and learn the trick by professionals.
In this article I am writing step by step to integrate twitter bootstrap in MVC application. Currently MVC 5 already integrates Bootstrap when we create new MVC application. Before we start integration bootstrap in our MVC application we need to learn what is bootstrap and what is the use of bootstrap in web application. About Twitter Bootstrap: Bootstrap, originally named Twitter Blueprint, was developed by Mark Otto and Jacob Thornton at Twitter as a framework to encourage consistency across internal tools. Bootstrap is nothing but simple and flexible HTML, CSS and Javascript for popular user interface components and interactions. Bootstrap is a open-source collection of tools. Bootstrap is a front end framework that is an interface for the user. There is so many simple HTML, thousands of classes, readymade Javascript, icons using this we can design our website easily, interactive and responsive.
We can integrate Twitter Bootstrap using following methods.
Method 1: Integrate Boostrap in MVC 5
When we create a new MVC 5 application by default .Net integrate bootstrap in our application.
Tools And Technology :
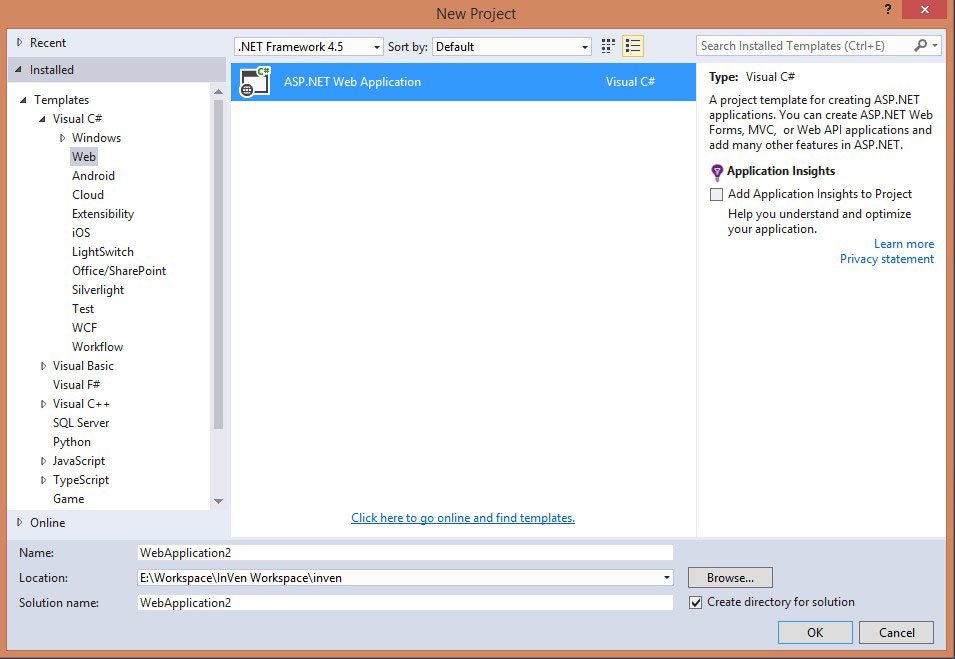
- Visual Studio 2015 - MVC 5 Step 1: Open Visual Studio 2015 Step 2: File => New => Project Step 3: Chose Web Template and select ASP.NET Web Application.

Step 4: Select MVC template.

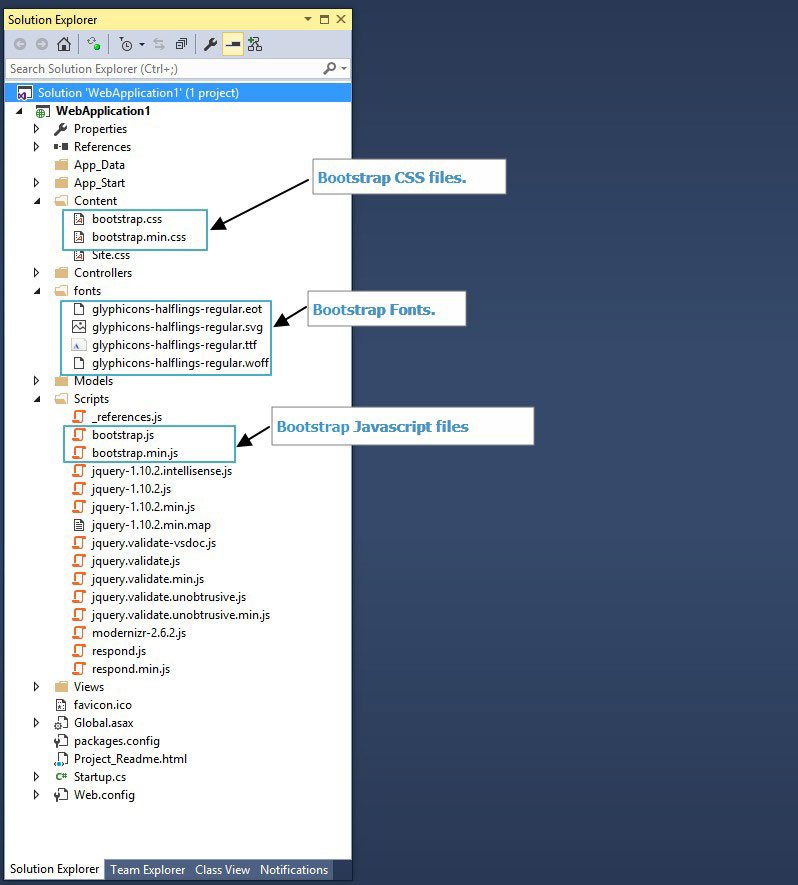
Great, your MVC application is created with bootstrap integration by default. There are already bootstrap fonts, css and javascript files are added in your solution.

Now, open your BundleConfig.cs file which is under App_Start folder. You can see there is already setting to bundle out bootstrap css and javascript file.
Now, bundle setting is done to use bootstrap style and javascript in our application. Open your _Layout.cshtml file which is under Views => Shared folder. In which you can see that at the top in head section there is already added
[email protected]("~/Content/css"). That mean we include our “css” bundles file which we already configured in our BundleConfig.cs file in our layout page. You can also see that
@Scripts.Render("~/bundles/bootstrap") is added at the bottom in _Layout.chstml. That means we include Bootstrap javascript files in layout which we configured in BundleConfig.cs file.

Note : When you create a new layout in your solution and want to use bootstrap style then you just need to add @Styles.Render("~/Content/css") under head section of layout page and add @Scripts.Render("~/bundles/bootstrap") bootstrap script bundle file at bottom section.
Method 2: Integrate bootstrap using Nuget package.
Tools And Technology:
- Visual Studio 2013 - MVC 4 Step 1: Open Visual Studio 2013 Step 2: File => New => Project Step 3: Chose Web Template and select ASP.NET 4 Web Application.

Step 4: Chose Internet Application from template and chose Razor View engine and click on OK button.

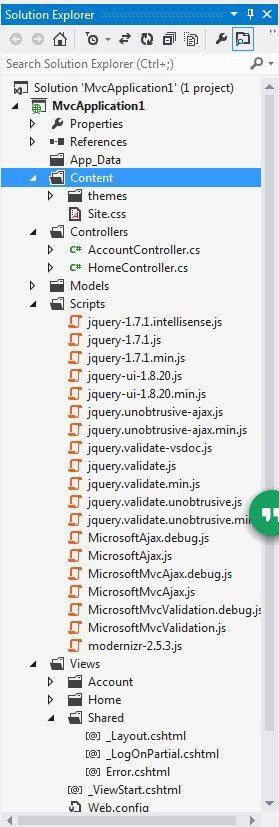
Step 5: Now, open your solution script and content folder, in which you can see there is already default css and script file included.


Step 6: Open package manager console.

Step 7: Write Install-Package bootstrap command in package manager console and press enter button.

Step 8: Now, Bootstrap is installed in your MVC application. You can see the following css and javascript file is added in your script and content folder.


If you see your Script folder with sharp eyes before install bootstrap package then there was jQuery-1.8.2 script files and in Content folder jQuery UI css files exists. But now after installed bootstrap package it was removed. The reason is bootstrap support jQuery version between 1.9.1 to 3.0
Step 9: Now, bootstrap css, fonts and javascript file is added in your solution. Step 10: Now create a bundle configuration to use bootstrap css and javasctipt in our application. Open BundleConfig.cs file which is under App_Start folder Create a following bootstrap javascript and css bundle.
Step 11: All the configuration is done, now we just need to use above bundle in Layout or View in which we need to use bootstrap style. i.e. If we want to use bootstrap style in all the view which layout is _Layout.cshtml then open _Layout.cshtml file which is under Shared folder.
- Add following bundle in head section.

- Add following line at bottom.

Method 3: Manually Integrate Bootstrap in MVC.
When you create a new MVC project in Visual studio 2013 and above bootstrap is by default integrated in application. So I used following technology to integrate bootstrap.
Tools And Technology :
- Visual Studio 2012 - MVC3 Step 1: Open Visual Studio 2012 Step 2: File => New => Project Step 3: Chose Asp.Net MVC 3 Web Application.

Step 4: Chose Internet Application and then click on Ok button.

Step 5: Now, our MVC web application is created with default files and folder at following.

Step 6: Now time to integrate bootstrap in our application, so first of all we need to download bootstrap. Open https://getbootstrap.com/ and click on download button.

Step 7: Click on Download Bootstrap button. Then you will redirect to following page and then download the source code.

Step 8: Now, you have a latest jquery, css and fonts of bootstrap which you just download.

Step 9: Now, open you MVC application and create a new folder “Bootstrap” under Content folder, then paste all above bootstrap folder “css, fonts,js” which you download under “Bootstrap” folder.

Step 10: Open _Layout.cshtml file which is under shared folder and add following code as per following screenshot.
Step 11: Now, bootstrap configuration is done in our application. So run the application. Step 12: Oops, when you try to run your application you will find the following error. That is because bootstrap is only comfortable with jQuery 1.9.1 and higher version. So we need to get and put latest version in our application.

Step 13: Go to https://blog.jquery.com/2014/05/01/jquery-1-11-1-and-2-1-1-released/ and download http://code.jquery.com/jquery-1.11.1.js Step 14: Add downloaded “jquery-1.11.1.js” file under Script folder.

Step 15: Now, we need to replace latest jquery. So open _Layout.cshtml file and replace following code.
We learned how to use and configure bootstrap in MVC application with following three methods.
- Integrate bootstrap in MVC 5
- Integrate bootstrap using Nuget package
- Manually configure bootstrap in MVC 3
This article shares everything important that you need to learn to integrate twitter bootstrap in ASP.NET mvc development solution. To get appropriate results, follow all the instructions and guidelines shared in this post by ASP.NET development experts. For reviews and feedback, kindly comment!
Recent Blogs
Categories


